When developing mobile applications, a common need is to be able to perform some task (long-running or otherwise) off the main thread and ensure that your main thread can respond appropriately when it completes. There are multiple ways to accomplish this sort of requirement, but I’m going to focus on how to handle it using the MessagingCenter. I covered a fairly simple “call and response” usage of MessagingCenter in my previous post for creating a Creating a Cross-Platform Soundboard, this one will leverage similar concepts but take things a bit further.
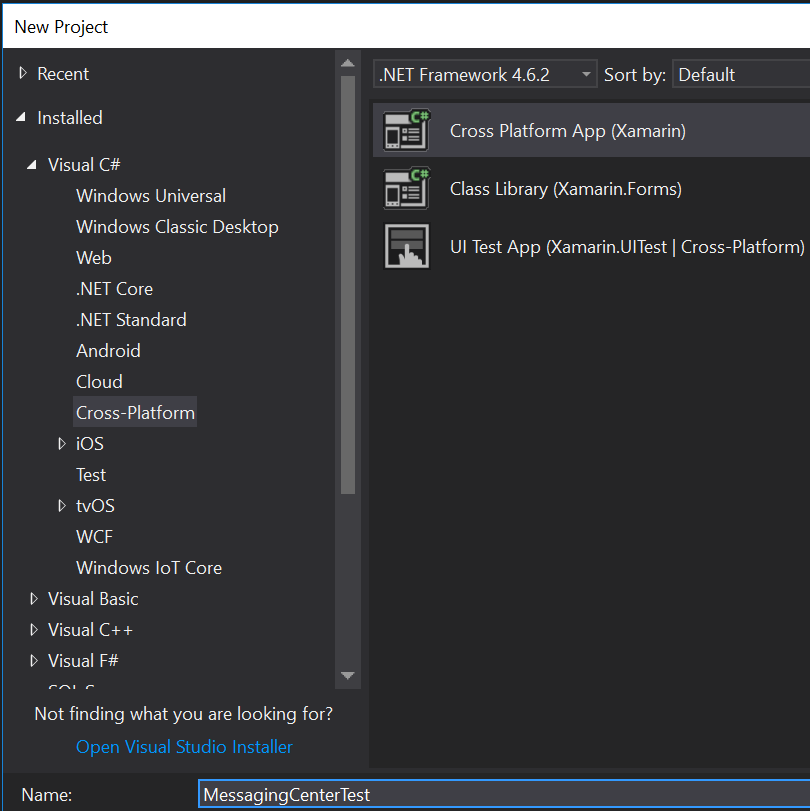
We’ll start out in Visual Studio and create a project of type Visual C# -> Cross-Platform -> Cross Platform App (Xamarin).
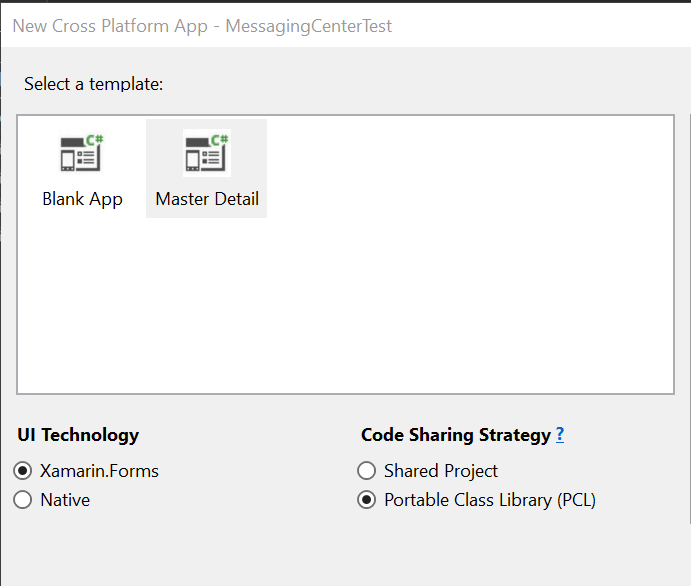
On the next screen, select Master Detail for the template and Portable Class Library (PCL) for the Code Sharing Strategy.
Churn, churn, churn goes the Visual Studio for a bit and then you’ll be prompted to select the UWP targets, I’m just going to leave them set at their defaults and hit OK.
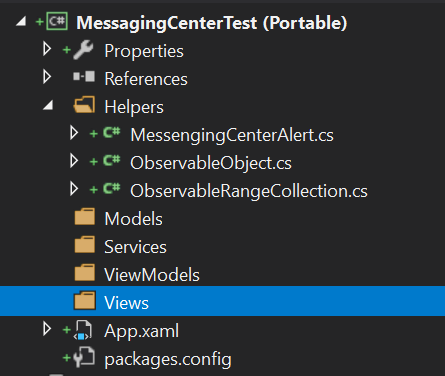
The Master Detail template adds in several files to help you understand the MVVM concepts and starts you off with an application you can actually run to see how it all fits together. Feel free to play around a bit with that if you’d like, but for our purposes, we’re going to delete out all of the files that were auto-generated into the Models, Services, ViewModels, and Views folders. This should leave us with a Portable project that looks something like this:
Now that we have a mostly clean project, we’ll begin building back up our sample application. Right-click on the Helpers folder, select Add -> Class and give it a name of MessagingCenterObject. In the new class file that opens, give the class a public accessor and add two public properties of type string: result and message.
1 2 3 4 5 6 7 8 | namespace MessagingCenterTest.Helpers { public class MessagingCenterObject { public string result { get; set; } public string message { get; set; } } } |
The next piece we want to add will be a ViewModel. Right-click on the ViewModels folder and select Add -> Class. For the name of the class, put in MainViewModel.cs and then click Add.
Give your new class a public accessor and set it to inherit from ObservableObject ( ObservableObject is a helper class that was added automagically for us by the template — you’ll need to add a using statement for the namespace to reference it – the reason we want to inherit from the ObservableObject is because it provides some base wiring that allows us to easily add binding properties that will update the UI when they are changed ). Add two public properties to the new MainViewModel class named Title and Label, both of type string and make sure to use the SetProperty helper for them. We also need a private MessagingCenterObject and a public Command. The Command is what we will use with a button in our view to fire off a message. This ends up with a class that looks like this
1 2 3 4 5 6 7 8 9 10 11 12 13 14 15 16 17 18 19 20 21 22 23 24 25 26 27 28 29 30 31 32 33 34 35 36 37 38 39 40 41 | using MessagingCenterTest.Helpers; using Xamarin.Forms; namespace MessagingCenterTest.ViewModels { public class MainViewModel : ObservableObject { private MessagingCenterObject msgObj; public Command ButtonCommand { get; set; } private string _title; public string Title { get { return _title; } set { SetProperty(ref _title, value); } } private string _label; public string Label { get { return _label; } set { SetProperty(ref _label, value); } } public MainViewModel() { Title = "Main View"; Label = "Waiting to Start"; // Initialize our messaging center object // it's blank for now because we don't need any parameters to the start msgObj = new MessagingCenterObject(); // We set the Button command so that when it fires it sends a start message // to the MessagingCenter ButtonCommand = new Command(() => { MessagingCenter.Send<MessagingCenterObject>(msgObj, "StartProcessing"); }); } } } |
With the ViewModel prepared, right-click on the Views folder and select Add -> New Item. From the template selection screen, select Xamarin.Forms on the left, then the XAML based Content Page on the right, and give it a name of MainView.xaml

For the view, we’ll use a simple Grid with two rows, one for a text label and one for a button.
1 2 3 4 5 6 7 8 9 10 11 12 13 14 15 16 17 18 19 20 21 22 23 24 25 26 27 | <?xml version="1.0" encoding="utf-8" ?> <ContentPage xmlns="http://xamarin.com/schemas/2014/forms" xmlns:x="http://schemas.microsoft.com/winfx/2009/xaml" xmlns:vm="clr-namespace:MessagingCenterTest.ViewModels" x:Class="MessagingCenterTest.Views.MainView" Title="{Binding Title}"> <!-- Make sure to add an XML namespace for your ViewModel namespace up above, mine is aliased to vm --> <!-- Add in the BindingContext and wire it in to the MainViewModel we created earlier--> <ContentPage.BindingContext> <vm:MainViewModel></vm:MainViewModel> </ContentPage.BindingContext> <ContentPage.Content> <Grid> <Grid.RowDefinitions> <RowDefinition Height="*"></RowDefinition> <RowDefinition Height="44"></RowDefinition> </Grid.RowDefinitions> <Grid.ColumnDefinitions> <ColumnDefinition Width="*"></ColumnDefinition> </Grid.ColumnDefinitions> <!-- Set the text of the label to the Label property in our viewmodel --> <Label Text="{Binding Label}" Grid.Row="0" Grid.Column="0" HorizontalOptions="CenterAndExpand" VerticalOptions="CenterAndExpand" /> <!-- Set the button to fire our viewmodel ButtonCommand when it is clicked --> <Button Text="Start Background" Command="{Binding ButtonCommand}" Grid.Row="1" Grid.Column="0"></Button> </Grid> </ContentPage.Content> </ContentPage> |
Before we go any further, we need to modify the App.xaml.cs file to properly point to our new view. Open the file and change the code in the SetMainPage() method to the following:
1 2 3 4 | public static void SetMainPage() { Current.MainPage = new MainView(); } |
Right now, if you run the project, you will get a display that has a label that displays “Waiting to Start” and a button. Clicking the button wouldn’t have any effect at this point because we are sending a message but no one is listening (sad, I know). Let’s provide something to listen and respond to the message.
Right-click on the Helpers folder, select Add -> Class, and give the file a name of BackgroundListener.cs. Modify the class so that it is public and static. We’ll need to do a few things in here to get it prepared properly: create a few static properties to help maintain state, provide a static method to initialize the class, and set up our MessagingCenter subscriptions. Our example is going to be very simplistic, the background process is just going to wait for a set period of time and then send a message back out saying it has completed a processing round. In the real world, you could use this for things such as reaching out to a web service to periodically refresh data, polling for other application updates, etc.
The code for the BackgroundListener class is below, it’s commented to explain what the different pieces are doing.
1 2 3 4 5 6 7 8 9 10 11 12 13 14 15 16 17 18 19 20 21 22 23 24 25 26 27 28 29 30 31 32 33 34 35 36 37 38 39 40 41 42 43 44 45 46 47 48 49 50 51 52 53 54 55 56 57 58 59 60 61 62 63 64 | using System.Threading.Tasks; using Xamarin.Forms; namespace MessagingCenterTest.Helpers { public static class BackgroundListener { // The MessagingCenterObject that we'll use for passing data back and forth private static MessagingCenterObject msgObj; // A simple int to keep track of how many loops we've done private static int loopCount = 0; // A boolean to keep track of whether or not we are already processing private static bool processing = false; // A boolean to keep track of whether or not we are already initialized private static bool initialized = false; public static void InitListener() { // Because we subscribe to events during the initialization, we want to ensure we don't initialize multiple times if (!initialized) { initialized = true; msgObj = new MessagingCenterObject(); loopCount = 0; processing = false; // When initialized, start listening for the "StartProcessing" message MessagingCenter.Subscribe<MessagingCenterObject>(msgObj, "StartProcessing", async (sender) => { // Only start processing if we aren't already doing so, this is to prevent feedback loops // from multiple starts if (!processing) { processing = true; loopCount = 0; await ProcessLoop(); } }); // When initialized, start listening for the "ContinueProcessing" message MessagingCenter.Subscribe<MessagingCenterObject>(msgObj, "ContinueProcessing", async (sender) => { await ProcessLoop(); }); } } private static async Task<bool> ProcessLoop() { // pause for 2 seconds before doing anything await Task.Delay(2000); // Set the message and result value of our MessagingCenterObject msgObj.message = $"Completed Processing Loop {++loopCount}"; msgObj.result = "Success"; // Send our MessagingCenterObject back out into the world as a "FinishedProcessing" message MessagingCenter.Send<MessagingCenterObject>(msgObj, "FinishedProcessing"); return true; } } } |
Before testing this out, we have two more adjustments to make; we need to modify our MainViewModel so that it subscribes to the FinishedProcessing event and add a line to our App.xaml.cs to spin up the BackgroundListener.
Modify the MainViewModel.cs file and add the following lines to the bottom of the MainViewModel() public constructor
1 2 3 4 5 6 7 8 9 | // Subscribe to the "FinishedProcessing" Message MessagingCenter.Subscribe<MessagingCenterObject>(msgObj, "FinishedProcessing", (sender) => { // Update the label based on the message received Label = sender.message; // Fire off a ContinueProcessing message to continue the communication MessagingCenter.Send<MessagingCenterObject>(msgObj, "ContinueProcessing"); }); |
Finally, modify the App.xaml.cs and change the public constructor to look like the following
1 2 3 4 5 6 7 8 9 | public App() { InitializeComponent(); // start up the backgroundlistener for the application BackgroundListener.InitListener(); SetMainPage(); } |
At this point, you can run the application on any of the platforms and be able to watch the call-and-response between your ViewModel and the background listener process.
In the next post, I’ll go over some slightly more complex concepts with MessagingCenter such as handling messages across multiple views and how to properly unsubscribe from MessagingCenter events to ensure you keep your event stack clean.