One of the things I enjoy doing when I’m going to jump into a new development area is to create a soundboard-type application. I like to do this for a few reasons:
- I like playing with soundboards
- It lets me work with media playback on the platform(s)
- It lets me work with file IO on the platform(s)
- It gives me a straight-forward UI structure to model towards
I did one for iOS native with Xcode, Android native with Android Studio, and a web-based solution using Visual Studio with .NET, and now I’m going to create a cross-platform soundboard using Xamarin Forms (for iOS, Android, and UWP). I plan to go through the entire process in a way that anyone new to Xamarin development will be able to follow step-by-step and have a working application by the end of these posts. An important thing to bear in mind with is that the code probably won’t be perfect and there will most likely be multiple different ways to reach the same goal (and some of the other ways could be better than the one I’ve chosen).
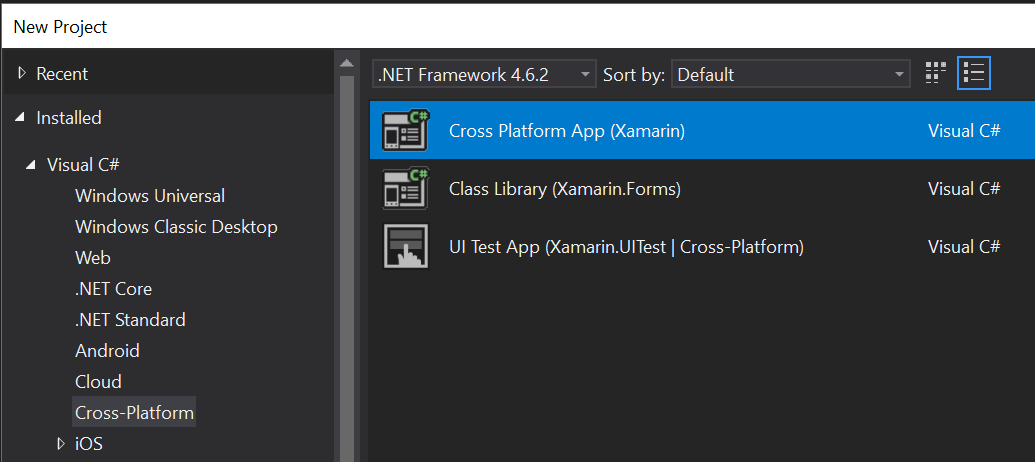
We’ll start out in Visual Studio and create a project of type Visual C# -> Cross-Platform -> Cross Platform App (Xamarin)
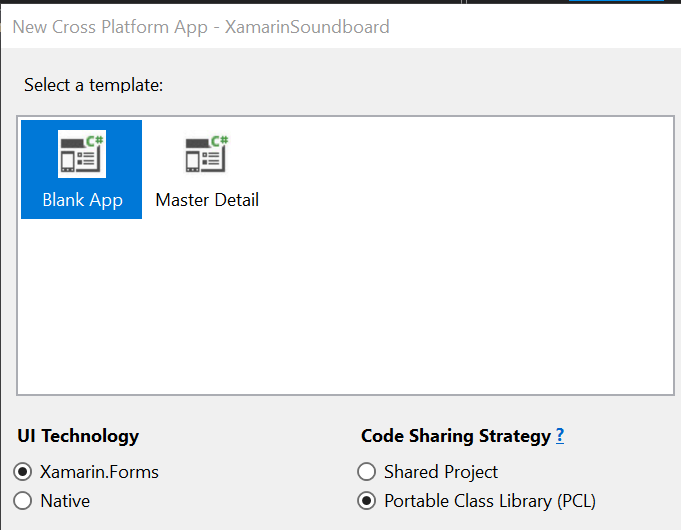
On the next project wizard screen, we’ll create it as a Blank App using Xamarin.Forms and with a Portable Class Library (PCL) (NOTE – I would normally recommend going with a Master Detail project and leveraging MVVM, but I want to keep this one very simple and basic).
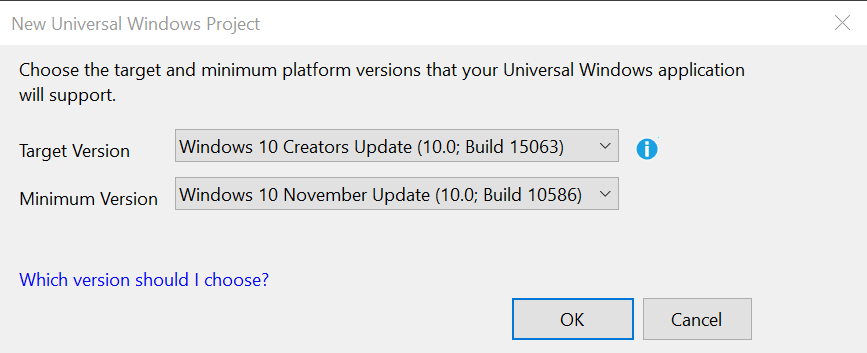
At this point, Visual Studio will churn for a bit as it creates all the necessary projects for your new Xamarin.Forms solution, relax and let it do its thing. Eventually, you will be prompted to select the version details for the Universal Windows Project (UWP), I’ll leave them at the defaults it pre-selects for me.
Once you select your targets, Visual Studio will do some more processing to finishing setting everything up for you. When it is finished, you’ll be presented with a solution that contains your PCL, Android, iOS, and UWP projects.

At this point, I’m going to deviate for a moment to discuss a key bit of knowledge that you’ll want to have at least a passing understanding of if you plan to do much with Xamarin and cross-platform development: the DependencyService.
That link goes out to true Xamarin documentation to give a full breakdown of what the DependencyService is and how you should use it, I highly recommend reading through it so you have a good grasp of the concepts. We’ll be making use of it in this application, which will give you a good real-world example of it, but the key elements are:
- Create the Interface in the PCL
- Create a custom class to implement the interface for each platform
- Each class must use a metadata attribute to register itself for the DependencyService
- Each class must have a parameterless constructor
- Calls through the DependencyService in the PCL will route to the correct platform implementation
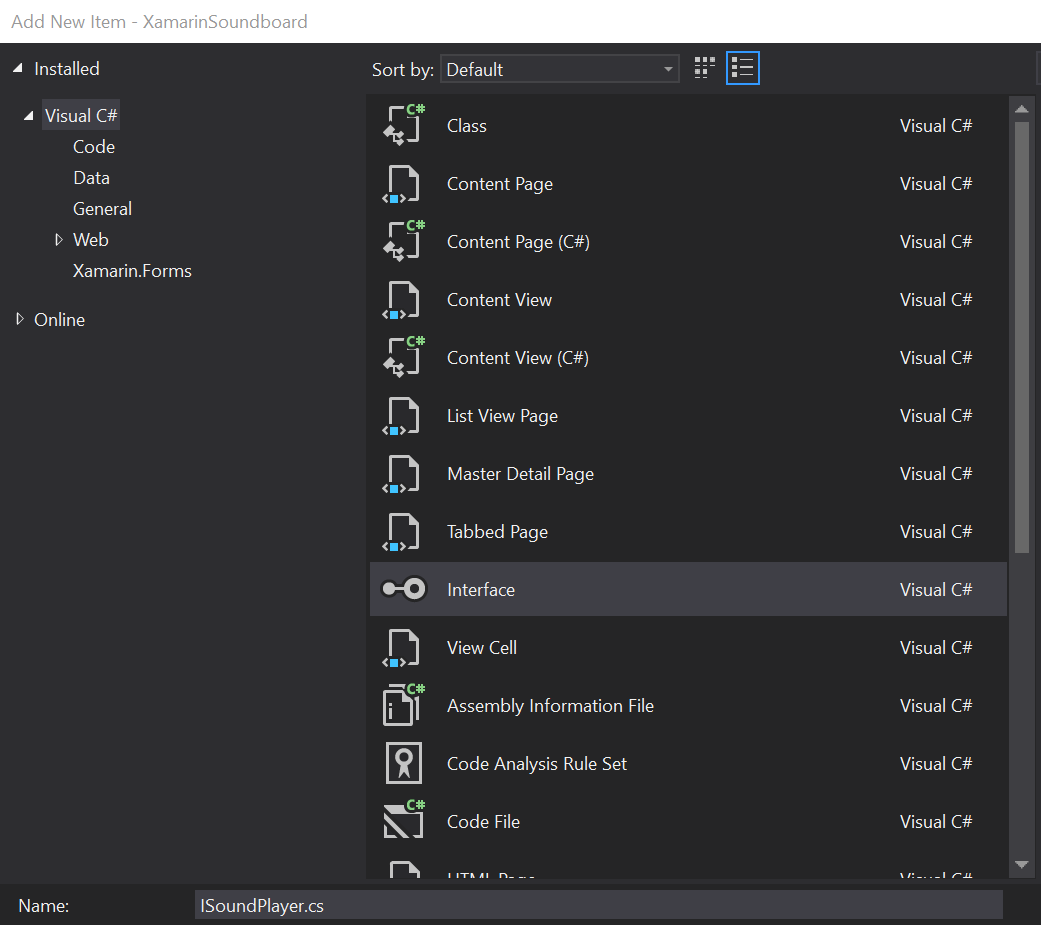
We’ll start with the easiest interface first, because it’s the easiest interface… In the case of the soundboard, the simplest interface will be the one that handles playing a sound file. Right click on the Portable project at the top of your solution and then select Add -> Add New Item. From the list of templates, select Visual C# -> Interface and give it a name of ISoundPlayer.cs.
Add an accessor for the interface to make it public, and give it a single void method named PlaySoundFile that takes a single string parameter named fileName.
1 2 3 4 5 6 7 | namespace XamarinSoundboard { public interface ISoundPlayer { void PlaySoundFile(string fileName); } } |
That’s it for the interface, told you it would be easy! Now we need to create a class for each platform that implements the interface. For our purposes here, we’re going to assume that we will be including the sound files in each of the platforms native ways: Android and UWP will have them as assets and iOS will have them as bundle resources. This means that we’ll end up having multiple copies of them in our solution, and there are options available to prevent having to do that, but that will be for another post.
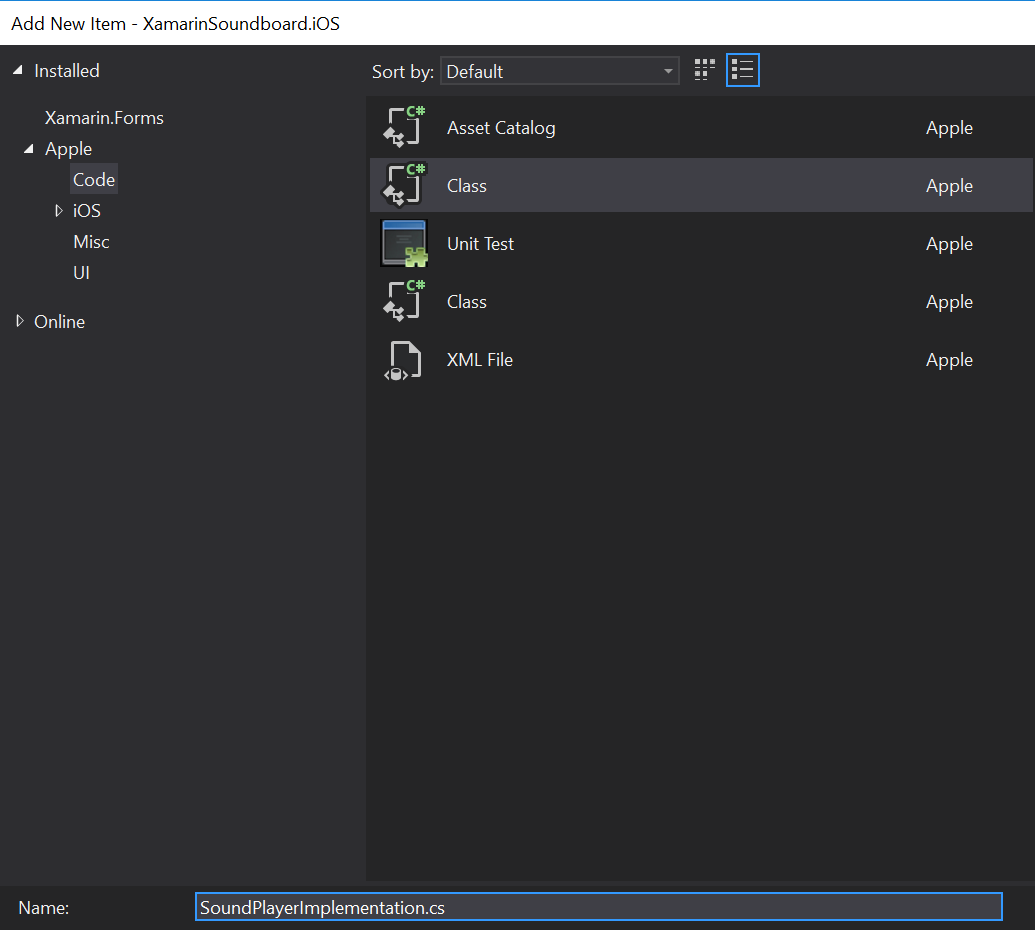
Going from top to bottom in our solution, we’ll create the Android implementation first (lucky for us it is also the simplest of the three). Right click on the Android project in the solution and select Add -> Class and give it the name SoundPlayerImplementation.

We want to add the public accessor to the new class, wire it up to the interface we created in the PCL (ISoundPlayer), and then implement the audio playback functionality for Android. Rather than use words to explain the implementation, I’ll just provided the actual code with a bunch of comments included.
1 2 3 4 5 6 7 8 9 10 11 12 13 14 15 16 17 18 19 20 21 22 23 24 25 26 27 28 29 30 31 32 33 34 35 36 37 38 | using Android.Media; using Xamarin.Forms; using XamarinSoundboard.Droid; [assembly: Dependency(typeof(SoundPlayerImplementation))] namespace XamarinSoundboard.Droid { public class SoundPlayerImplementation : ISoundPlayer { public SoundPlayerImplementation() { } public void PlaySoundFile(string fileName) { // Create a new Android MediaPlayer object // In android, it will remain in scope while it is playing, so we can create and instantiate it inside the method var player = new MediaPlayer(); // Retrieve an asset file descriptor to the file name passed in out of the application assets var fd = global::Android.App.Application.Context.Assets.OpenFd(fileName); // Add a delegate handler that fires once the file is fully prepared in the media player // that will start the sound playback player.Prepared += (s, e) => { player.Start(); }; // Wire up the datasource using the FileDescriptor, start offset of the file, and the length of the file player.SetDataSource(fd.FileDescriptor, fd.StartOffset, fd.Length); // Close out the file descriptor fd.Close(); // instruct the MediaPlayer to prepare for playback player.Prepare(); } } } |
Key items to note are the metadata instruction that registers our class to the DependencyService and the implementation of the interface we created in the PCL.
Next, we’ll create the implementation file for iOS – right click on the iOS project then choose Add -> Class and give it the same name of SoundPlayerImplementation (the namespaces will take care of keeping them unique for us across the solution).
Just like with the Android implementation, we want to add the public accessor to the new class, wire it up to the interface we created in the PCL (ISoundPlayer), and then implement the audio playback functionality for iOS. There is a little bit more to the code in iOS, mainly because of how we will instantiate the audio player from the resource bundle. The code and comments will explain it better than I could type it back out.
1 2 3 4 5 6 7 8 9 10 11 12 13 14 15 16 17 18 19 20 21 22 23 24 25 26 27 28 29 30 31 32 33 34 35 36 37 38 39 40 41 42 43 44 45 46 47 48 49 50 51 52 53 54 55 | using Xamarin.Forms; using XamarinSoundboard.iOS; using Foundation; using System.IO; using AVFoundation; [assembly: Dependency(typeof(SoundPlayerImplementation))] namespace XamarinSoundboard.iOS { public class SoundPlayerImplementation : ISoundPlayer { // Need to have the iOS audio player scoped outside of the method so the playback can persist private AVAudioPlayer audioPlayer; public SoundPlayerImplementation() { } public void PlaySoundFile(string fileName) { // Retrieve the path to the file where it is housed within the bundle resources string sFilePath = NSBundle.MainBundle.PathForResource(Path.GetFileNameWithoutExtension(fileName), Path.GetExtension(fileName)); // Create a URL for the file inside the bundle resources - we do this for simplicity in play back var url = NSUrl.FromString(((NSString)sFilePath).CreateStringByAddingPercentEscapes(NSStringEncoding.UTF8)); // Since the audio player is scoped outside of the method, we need to handle what to do if it is already playing // a sound when they trigger another to play if (audioPlayer != null) { audioPlayer.Stop(); audioPlayer.Dispose(); } // Instantiate the AudioPlayer from the URL we created above audioPlayer = AVAudioPlayer.FromUrl(url); // Sanity check to make sure it was able to properly create the player if (audioPlayer != null) { // Set it for a single playback audioPlayer.NumberOfLoops = 0; // Add a delegate to perform some clean-up after it finishes playing audioPlayer.FinishedPlaying += delegate { audioPlayer = null; }; // Start playing the sound file audioPlayer.Play(); } } } } |
Finally, we’ll create the implementation class for UWP – right click on the Universal Windows project then choose Add -> Class and give it the same name of SoundPlayerImplementation.
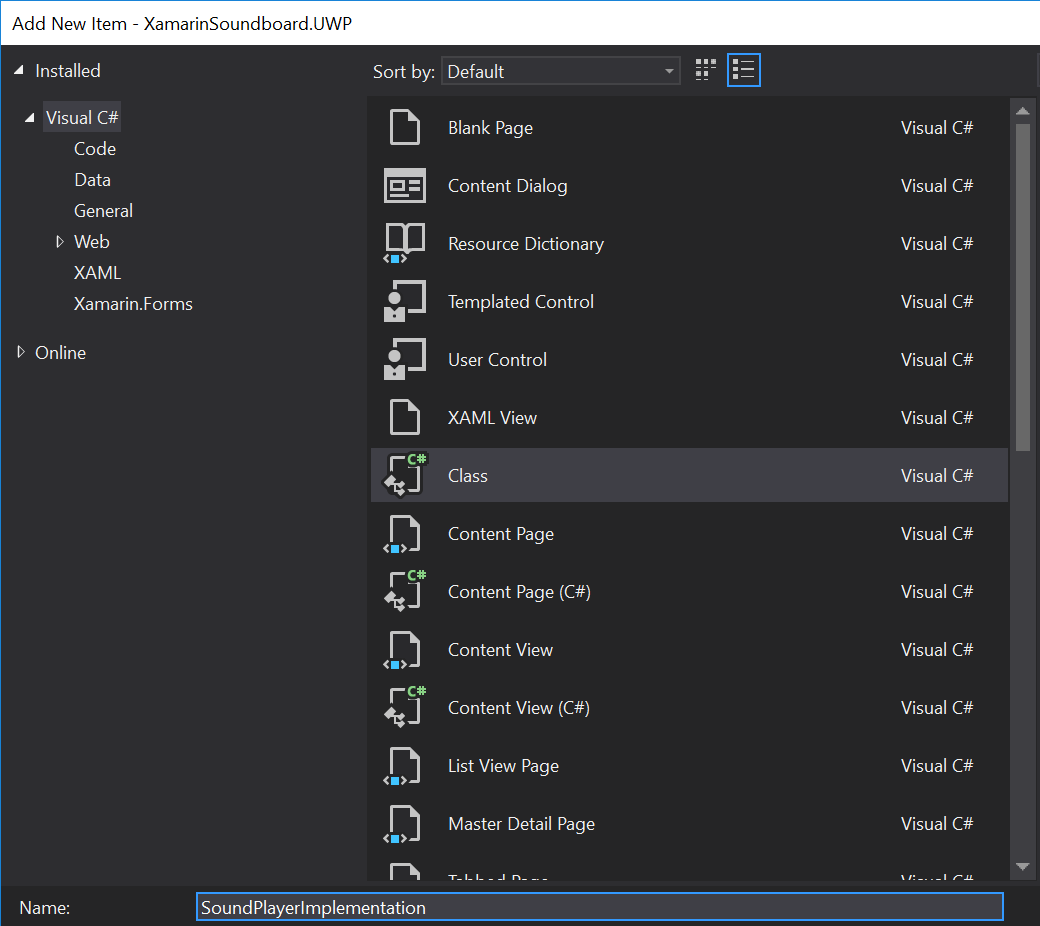
All the same words that I used about Android and iOS up above apply here, and then the code explains the rest.
1 2 3 4 5 6 7 8 9 10 11 12 13 14 15 16 17 18 19 20 21 22 23 24 25 26 27 28 29 30 31 32 33 34 35 36 37 38 39 40 41 42 43 44 45 46 47 48 49 50 51 52 53 54 55 56 57 | using System; using XamarinSoundboard.UWP; using Windows.UI.Xaml.Controls; using Xamarin.Forms; [assembly: Dependency(typeof(SoundPlayerImplementation))] namespace XamarinSoundboard.UWP { public class SoundPlayerImplementation : ISoundPlayer { // Need to have the UWP media element scoped outside of the method so the playback can persist MediaElement el; public SoundPlayerImplementation() { } public async void PlaySoundFile(string fileName) { // Retrieve a storage folder for the Assets folder of the application Windows.Storage.StorageFolder folder = await Windows.ApplicationModel.Package.Current.InstalledLocation.GetFolderAsync("Assets"); // Retrieve the storage file from the assets folder Windows.Storage.StorageFile file = await folder.GetFileAsync(fileName); // Open the file stream from the storage file Windows.Storage.Streams.IRandomAccessStream stream = await file.OpenAsync(Windows.Storage.FileAccessMode.Read); // Since the audio player is scoped outside of the method, we need to handle what to do if it is already playing // a sound when they trigger another to play if (el != null) { el.Stop(); el = null; } // Instantiate a new MediaElement el = new MediaElement(); // Instruct the media element to load the storage file stream el.SetSource(stream, file.ContentType); // Make sure the media element isn't muted el.IsMuted = false; // Set the media element volume el.Volume = 1; // Add a delegate to perform some clean-up after it finishes playing el.MediaEnded += (sender, e) => { ((MediaElement)sender).Stop(); sender = null; }; // Ensure we start at the beginning of the sound file el.Position = new TimeSpan(0, 0, 0); // Start playing the sound file el.Play(); } } } |
Before we go any further with the soundboard, let’s allow ourselves a little satisfaction by testing out the SoundPlayer implementations and hearing some sweet, melodious sounds on each of the platforms. This will require a little throw-away work, but what we do here will inform the code we write for the real soundboard logic later. The first thing to do will be to add an MP3 file to each of the platform-specific projects, we’ll do this by clicking on Add -> Existing Item and then selecting an MP3 file from your computer in each of the following locations:
- For Android, right click on the Assets folder
- For iOS, right click on the Resource folder
- For UWP, right click on the Assets folder
Adding the MP3 file at these locations will automagically set the Build Action to the correct type so that the files go out correctly when we deploy to each platform. To trigger the DependencyService and play the MP3 file, we’ll need to go back up to the PCL and edit the MainPage.xaml file to include a button. For this test, just remove the generic label that was included and stick in a button that has a Clicked event
1 2 3 4 5 6 7 8 9 | <?xml version="1.0" encoding="utf-8" ?> <ContentPage xmlns="http://xamarin.com/schemas/2014/forms" xmlns:x="http://schemas.microsoft.com/winfx/2009/xaml" xmlns:local="clr-namespace:XamarinSoundboard" x:Class="XamarinSoundboard.MainPage"> <Button x:Name="SoundButton" Text="Sound" Clicked="SoundButton_Clicked"></Button> </ContentPage> |
Now, head to the code-behind file for the XAML (hotkey F7, or right-click in the page and select View Code, or open MainPage.xaml.cs from Solution Explorer) and add in the SoundButton_Clicked event:
1 2 3 4 5 6 | private void SoundButton_Clicked(object sender, EventArgs e) { // Make use of the dependency service to call the platform specific implementation of our SoundPlayer // Make sure to put in the actual file name of your MP3 file -- It is case sensitive! DependencyService.Get<ISoundPlayer>().PlaySoundFile("Awesome.mp3"); } |
And that’s it, now you can run it on each of your platforms and you’ll be presented with a full-screen button with the text Sound on it. Clicking that button on any of the platforms will cause it to play the MP3 file that you added to your project.
That’s it for part 1, you should now have the base project created and be able to run a program that will display a gigantic button that plays an embedded MP3 file upon being clicked on each of the target platforms!
-CubicleNinja